Difference between revisions of "Install and Basic Configuration"
| (70 intermediate revisions by 2 users not shown) | |||
| Line 1: | Line 1: | ||
| − | <h1>'''How to install MupsBox'''</h1> | + | <h1>'''How to install and Upgrade MupsBox'''</h1> |
| − | < | + | <p>Starting with version 1.4, the program is shipped with the installer, which simplifies the process of installing and updating the program. When you start the installer, you are prompted to select the installation path. By default destination location is Letter of installed operation system and application name. For example: C:\MupsBox.</p> |
| − | |||
| − | When you start the | ||
| − | |||
| − | [[File: | + | [[File:Install selectdir.png|Install selectdir]] |
| + | <br>Type Installation page provides chose options between: | ||
| − | < | + | <li>Server - default installation application with database on current machine.<br> |
| − | + | </li> | |
| − | + | <li>Client - Installation only application without database. There is need put IP address and folder path information for connect to database on remote host. | |
| + | </li> | ||
| + | [[File:Installation - Type installation.png]] | ||
| + | |||
| + | <p>On select components page can be chosen custom next options: | ||
| + | |||
| + | * Main Files - the core of application. | ||
| + | * Firebird SQL Server - Database, that keep information data of application. During update process installer will be compare current database SQL server and new one. | ||
| + | * Web components - Not necessary components for new web features.</p> | ||
| + | |||
| + | [[File:Installation - select components.png]] | ||
| + | |||
| + | <p>During first installation, if Firebird SQL served was not installed and select component was checked, application provide page for fill SYSDBA password for new instance.</p> | ||
| + | |||
| + | [[File:Installation - SYSDBA password.png]] | ||
| + | |||
| + | Select Start Menu folder: | ||
| + | |||
| + | [[File:Installation - select start menu option.png]] | ||
| + | |||
| + | Create desktop shortcut | ||
| + | |||
| + | [[File:Installation - create shortcut.png]] | ||
| + | |||
| + | After progress installation, installer show | ||
| + | |||
| + | [[File:Installation - Complete.png]] | ||
| + | |||
| + | <h2>'''Using Firebird 3.x'''</h2> | ||
| + | There is a Firebird database used to store data like connection data to devices, temporary data, statistical data, etc. MupsBox uses version 3.x. Firebird can be installed using application installer or manually. When you run manual installation, select a language, accept the terms of the agreement, select the installation folder, select which components to install (you can leave the default), create shortcuts in the menu, select additional tasks ( can be left by default).<br> | ||
| + | <div id="shbox" style=" border-width:1px; border-color:lightgrey; padding: 2px 5px 2px 10px; min-height:56px; border-style:solid; font-size: 0.9em;">[[File:Icon-warn.png|left|56px]] | ||
| + | <p style="margin-top:10px; margin-left: 56px;"><b style="color:red;">Warning:</b> Firebird 2.5 database support terminated. Firebird 4.0 database support not optimized. Please use only 3.0 version.</p></div> | ||
<h2>The location of the program on the server.</h2> | <h2>The location of the program on the server.</h2> | ||
<p>You need to place the executable program files in the same folder with the following files</p> | <p>You need to place the executable program files in the same folder with the following files</p> | ||
| − | <p><ul> | + | <div id="shbox" style=" border-width:1px; border-color:lightgrey; padding: 2px 5px 2px 10px; min-height:56px; border-style:solid; font-size: 0.9em;"> |
| − | <li>MupsBox.exe - is the main application, a device management GUI application.<br></li> | + | [[File:Icon-warn.png|left|56px]] |
| + | <p style="margin-top:10px; margin-left: 56px;"><b style="color:red;">Attention:</b> If your antivirus warns that one of our services is Trojan or Malware, send these files to the antivirus vendor so that they add their signatures to the exceptions. We do not have Trojans and other filth.</p><p style="margin-top:10px; margin-left: 56px;"></p></div>There is some of main files of application:<ul> | ||
| + | <li>MupsBox.exe - is the main application, a device management GUI application.<br> | ||
| + | </li> | ||
<li>MBTrafficser.exe - is a service for regularly receiving Traffic Accounting data.<br></li> | <li>MBTrafficser.exe - is a service for regularly receiving Traffic Accounting data.<br></li> | ||
<li>MBBackupService.exe - is a service for running backup tasks.<br></li> | <li>MBBackupService.exe - is a service for running backup tasks.<br></li> | ||
<li>MBFtpService.exe - is a service for running an ftp server on your PC.<br></li> | <li>MBFtpService.exe - is a service for running an ftp server on your PC.<br></li> | ||
<li>MBSyslogService.exe - is a data collection service for the Syslog module.<br></li> | <li>MBSyslogService.exe - is a data collection service for the Syslog module.<br></li> | ||
| + | <li>MBPoolingService.exe - A service that polls devices for a given timer.<br></li> | ||
<li>Config.ini - application configuration file.<br></li> | <li>Config.ini - application configuration file.<br></li> | ||
<li>MBDB.FDB - application database file.<br></li> | <li>MBDB.FDB - application database file.<br></li> | ||
| Line 25: | Line 58: | ||
<li>defbottom.rtf - File for editing report style<br></li> | <li>defbottom.rtf - File for editing report style<br></li> | ||
<li>ssleay32.dll and libeay32.dll - SSL libraries</li> | <li>ssleay32.dll and libeay32.dll - SSL libraries</li> | ||
| + | <li>libssh2.dll and libcrypto-1_1-x64.dll - library for the client part of sftp</li> | ||
| + | <li>msvcp110.dll, vcruntime140.dll, msvcr110.dll, msvcr100.dll - supporting libraries</li> | ||
</ul></p> | </ul></p> | ||
| − | + | ||
| − | |||
| − | |||
| − | |||
| − | |||
| − | |||
| − | |||
| − | |||
| − | |||
| − | |||
| − | |||
<h1>'''First start'''</h1> | <h1>'''First start'''</h1> | ||
| − | <p>When you first start MupsBox.exe, you | + | <p>When you first start MupsBox.exe, you should create a new database or open an existing database.</p> |
| − | [[File:Create- | + | [[File:Create-DB2.png|alt=|DataBase Settings]] |
<p>If you are installing the program for the first time, then click Create. If you already have a database, click Open.</p> | <p>If you are installing the program for the first time, then click Create. If you already have a database, click Open.</p> | ||
<p>After clicking on the selected button, a window will appear, where you need to select the path and name to save or open your database.</p> | <p>After clicking on the selected button, a window will appear, where you need to select the path and name to save or open your database.</p> | ||
| − | [[File: | + | [[File:Select-path1.png|alt=|Select Path]] |
<p>After you have chosen a place to create or open your database and give it a name, click the Save or Open button. And you will see that the database was created (opened) as in the image below.</p> | <p>After you have chosen a place to create or open your database and give it a name, click the Save or Open button. And you will see that the database was created (opened) as in the image below.</p> | ||
| − | [[File:DB- | + | [[File:DB-created1.png|alt=|DB Created]] |
| + | |||
<h1>'''Before install services'''</h1> | <h1>'''Before install services'''</h1> | ||
| − | <p>It | + | <p>It's necessary to configure settings for services Syslog, FTP and also configure notifications.</p><p>The application provide different type of notification: via mail, via sms, via telegram</p> |
| − | <p> | + | |
| − | [[File: | + | <h2>Notifications via mail</h2> |
| − | <p>127.0.0.1 - your local | + | [[File:Notification1.png|alt=|Notifications]] |
| − | <p>514 - UDP port to listen messages</p> | + | <ul> |
| + | <li><p>Mail server - your mail server</p></li> | ||
| + | <li><p>SSL options - choose appropriate method of security: SSLv2, SSLv23, SSLv3, TLSv1, TLSv1.1, TLSv.1.2 or without SSL option.</p></li> | ||
| + | <li><p>Mail port - port without SSL</p></li> | ||
| + | <li><p>Mail user - username to logon to mail server</p></li> | ||
| + | <li><p>Mail password - password for your username</p></li> | ||
| + | <li><p>Mail From - Custom MAIL FROM</p></li> | ||
| + | <li><p>Mail global recipient - mail to send all notifications(can be redefined in jobs)</p></li> | ||
| + | <li><p>Check - MupsBox will send a test email</p></li> | ||
| + | <li><p>Save - save your settings for notifications</p></li> | ||
| + | </ul> | ||
| + | |||
| + | |||
| + | |||
| + | <h2>Notifications via telegram</h2> | ||
| + | |||
| + | [[File:Notification telegram.png|alt=|Notifications]] | ||
| + | <ul> | ||
| + | <li><p>Key bot - link on telegram channel</p></li> | ||
| + | <li><p>Client id - Id that new massages should be send.</p></li> | ||
| + | <li><p>use proxy - use proxy setting for send messages</p></li> | ||
| + | <li><p>Proxy server - proxy server for send telegram messages</p></li> | ||
| + | <li><p>Proxy port - port of proxy server for send telegram messages</p></li> | ||
| + | <li><p>User - user on proxy server for send telegram messages</p></li> | ||
| + | <li><p>Password - password on proxy server for send telegram messages</p></li> | ||
| + | <li><p>Test string - Send a test telegram string</p></li> | ||
| + | </ul> | ||
| + | |||
| + | <h2>Local FTP/SFTP</h2> | ||
| + | [[File:SFP-service1.png|alt=|FTP Service]] | ||
| + | <br> | ||
| + | [[File:FTP-service1.png|alt=|SFTP Service]] | ||
| + | |||
| + | By default, please use SFTP service for your goals. | ||
| + | <ul> | ||
| + | <li><p>User - username to connect to the local SFTP or FTP service</p></li> | ||
| + | <li><p>Password - Password to connect to the local SFTP or FTP service</p></li> | ||
| + | <li><p>Directory - Folder in which they will connect via SFTP or FTP</p></li> | ||
| + | <li><p>Port - SFTP / FTP - port</p></li> | ||
| + | </ul> | ||
| + | |||
| + | <h2>Syslog</h2> | ||
| + | [[File:Syslog-service1.png|alt=|Syslog]] | ||
| + | <ul> | ||
| + | <li><p>127.0.0.1 - your local IP or your IP address to listen all by UDP</p></li> | ||
| + | <li><p>514 - UDP port to listen to messages</p></li> | ||
| + | </ul> | ||
| + | |||
| + | <h2>HotSpot</h2> | ||
| + | [[File:Hotspot-service1.png|alt=|Hotspot]] | ||
| + | <ul> | ||
| + | <li><p>IP Address Syslog for Hotspot gateway - your local IP or your IP address to listen all by UDP</p></li> | ||
| + | <li><p>Port Syslog for Hotspot Gateway - UDP port to listen to messages. <b style="color:red;">Warning:</b> The port must be different from the port for syslog </p></li> | ||
| + | <li><p>Spam SMS tries - counts of fail tries to use SMS authentication. After threshold, mac address will add to black list. </p></li> | ||
| + | </ul> | ||
| + | |||
| + | <h2>Options</h2> | ||
| + | [[File:Options1.png|alt=|Options]] | ||
| + | <ul> | ||
| + | <li><p>Number of device threads - How many threads to use for polling devices</p></li> | ||
| + | <li><p>Number of IP scanner threads - How many threads to use to search for devices</p></li> | ||
| + | <li><p>Web server port - port on which the web server will be launched</p></li> | ||
| + | <li><p>* debug - additional logs for services</p></li> | ||
| + | <li><p>Device service timer (min) - how often to automatically poll devices</p></li> | ||
| + | <li><p>Double click on device - choose what will happen when you double-click or when you click on enter</p></li> | ||
| + | <li><p>SSH/Telnet - which application will open when you click on the button [[File:ssh.png|Start ssh]]</p></li> | ||
| + | <li><p>Text Backup alert - Adds a warning with the given text to the message body</p></li> | ||
| + | <li><p>Size logs/tmp - shows folder size</p></li> | ||
| + | <li><p>Clear logs/tmp - clears all contents of folders</p></li> | ||
| + | </ul> | ||
| + | |||
| + | <h3>Users and permissions</h3> | ||
| + | <p>When you click on the [[File:add.png|Add User]] button, you can add a user with defined access rights to the application.</p> | ||
| + | [[File:User-permissions.png|alt=|Users and permissions]] | ||
| + | |||
| + | <h1>'''Install and Start services'''</h1> | ||
| + | <ul> | ||
| + | <li><p>To install the service, you must click on the install button next to the name of the service.</p></li> | ||
| + | <li><p>To start the service, you must click on the start button next to the name of the service.</p></li> | ||
| + | </ul> | ||
| + | [[File:Services1.png|alt=|Services]] | ||
| + | |||
| + | <h1>'''How to Upgrade MupsBox'''</h1> | ||
| + | <ul> | ||
| + | <li><p>The first step is to stop all services.</p></li> | ||
| + | <li><p>Next, you need to uninstall all services.</p></li> | ||
| + | <li><p>After downloading the archive of the new version of the program.</p></li> | ||
| + | <li><p>Unpack the contents of the archive into the folder where MupsBox software is installed.</p></li> | ||
| + | <li><p>After starting the program, the system will offer you to update the database. Click Update.</p></li> | ||
| + | </ul> | ||
| + | [[File:Upgrade_db2.png|Upgrade DB]] | ||
| + | <ul> | ||
| + | <li><p>After updating the database, install and start the services.</p></li> | ||
| + | </ul> | ||
| + | <h1>'''Activation'''</h1> | ||
| + | <p>Activation shows what level of license is installed in your copy of the MupsBOX program. | ||
| + | To activate your license level, you need to fill your real email address, select the license level of the module you want to activate and click Save Level. After that, you need to generate your License ID by clicking the Get License ID button, you will receive a unique identifier that you need to send to email '''support@mupssoft.com''', our specialists will generate a key that will send you back to email. The resulting key must be placed in the License key field, click the Save button and restart the program. </p> | ||
| + | <p>There is faster way for provide license ID information. The lic.id file button provide save license for all modules to file. Then send file to email '''support@mupssoft.com''', our specialists will generate a key file that will send you back to email. Then you use Load key button for fill license keys for each modules.</p> | ||
| + | [[File:Activation1.png|alt=|Activation]] | ||
| + | |||
| + | <div id="BackToTop" class="noprint" style="background-color:#DDEFDD; position:fixed; | ||
| + | bottom:32px; left:2%; z-index:9999; padding:0; margin:0;"><span style="color:blue; | ||
| + | font-size:8pt; font-face:verdana,sans-serif; border:0.2em outset #ceebf7; | ||
| + | padding:0.1em; font-weight:bolder; -moz-border-radius:8px; "> | ||
| + | [[#top| Back to the Top]]</span></div><div id="turnkey-credit"> <div style="clear: both;"> [https://www.turnkeylinux.org/mediawiki MediaWiki Appliance] - Powered by [https://www.turnkeylinux.org TurnKey Linux] </div> </div> | ||
| + | <div id="turnkey-credit"> <div style="clear: both;"> [https://www.turnkeylinux.org/mediawiki MediaWiki Appliance] - Powered by [https://www.turnkeylinux.org TurnKey Linux] </div> </div> | ||
| + | <div id="turnkey-credit"> <div style="clear: both;"> [https://www.turnkeylinux.org/mediawiki MediaWiki Appliance] - Powered by [https://www.turnkeylinux.org TurnKey Linux] </div> </div> | ||
| + | <div id="turnkey-credit"> <div style="clear: both;"> [https://www.turnkeylinux.org/mediawiki MediaWiki Appliance] - Powered by [https://www.turnkeylinux.org TurnKey Linux] </div> </div> | ||
| + | <div id="turnkey-credit"> <div style="clear: both;"> [https://www.turnkeylinux.org/mediawiki MediaWiki Appliance] - Powered by [https://www.turnkeylinux.org TurnKey Linux] </div> </div> | ||
| + | <div id="turnkey-credit"> <div style="clear: both;"> [https://www.turnkeylinux.org/mediawiki MediaWiki Appliance] - Powered by [https://www.turnkeylinux.org TurnKey Linux] </div> </div><div id="turnkey-credit"> <div style="clear: both;"> [https://www.turnkeylinux.org/mediawiki MediaWiki Appliance] - Powered by [https://www.turnkeylinux.org TurnKey Linux] </div> </div><div id="turnkey-credit"> <div style="clear: both;"> [https://www.turnkeylinux.org/mediawiki MediaWiki Appliance] - Powered by [https://www.turnkeylinux.org TurnKey Linux] </div> </div><div id="turnkey-credit"> <div style="clear: both;"> [https://www.turnkeylinux.org/mediawiki MediaWiki Appliance] - Powered by [https://www.turnkeylinux.org TurnKey Linux] </div> </div><div id="turnkey-credit"> <div style="clear: both;"> [https://www.turnkeylinux.org/mediawiki MediaWiki Appliance] - Powered by [https://www.turnkeylinux.org TurnKey Linux] </div> </div><div id="turnkey-credit"> <div style="clear: both;"> [https://www.turnkeylinux.org/mediawiki MediaWiki Appliance] - Powered by [https://www.turnkeylinux.org TurnKey Linux] </div> </div><div id="turnkey-credit"> <div style="clear: both;"> [https://www.turnkeylinux.org/mediawiki MediaWiki Appliance] - Powered by [https://www.turnkeylinux.org TurnKey Linux] </div> </div><div id="turnkey-credit"> <div style="clear: both;"> [https://www.turnkeylinux.org/mediawiki MediaWiki Appliance] - Powered by [https://www.turnkeylinux.org TurnKey Linux] </div> </div><div id="turnkey-credit"> <div style="clear: both;"> [https://www.turnkeylinux.org/mediawiki MediaWiki Appliance] - Powered by [https://www.turnkeylinux.org TurnKey Linux] </div> </div><div id="turnkey-credit"> <div style="clear: both;"> [https://www.turnkeylinux.org/mediawiki MediaWiki Appliance] - Powered by [https://www.turnkeylinux.org TurnKey Linux] </div> </div><div id="turnkey-credit"> <div style="clear: both;"> [https://www.turnkeylinux.org/mediawiki MediaWiki Appliance] - Powered by [https://www.turnkeylinux.org TurnKey Linux] </div> </div><div id="turnkey-credit"> <div style="clear: both;"> [https://www.turnkeylinux.org/mediawiki MediaWiki Appliance] - Powered by [https://www.turnkeylinux.org TurnKey Linux] </div> </div><div id="turnkey-credit"> <div style="clear: both;"> [https://www.turnkeylinux.org/mediawiki MediaWiki Appliance] - Powered by [https://www.turnkeylinux.org TurnKey Linux] </div> </div><div id="turnkey-credit"> <div style="clear: both;"> [https://www.turnkeylinux.org/mediawiki MediaWiki Appliance] - Powered by [https://www.turnkeylinux.org TurnKey Linux] </div> </div><div id="turnkey-credit"> <div style="clear: both;"> [https://www.turnkeylinux.org/mediawiki MediaWiki Appliance] - Powered by [https://www.turnkeylinux.org TurnKey Linux] </div> </div><div id="turnkey-credit"> <div style="clear: both;"> [https://www.turnkeylinux.org/mediawiki MediaWiki Appliance] - Powered by [https://www.turnkeylinux.org TurnKey Linux] </div> </div> | ||
Latest revision as of 07:32, 13 June 2021
How to install and Upgrade MupsBox
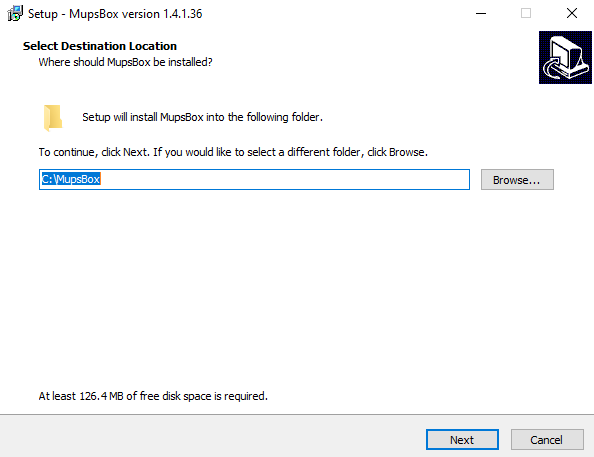
Starting with version 1.4, the program is shipped with the installer, which simplifies the process of installing and updating the program. When you start the installer, you are prompted to select the installation path. By default destination location is Letter of installed operation system and application name. For example: C:\MupsBox.
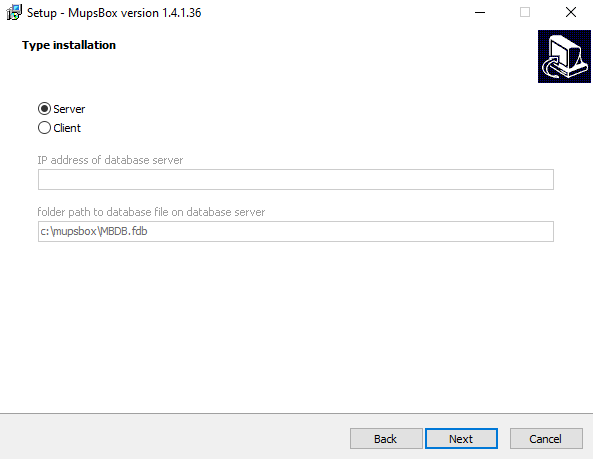
Type Installation page provides chose options between:
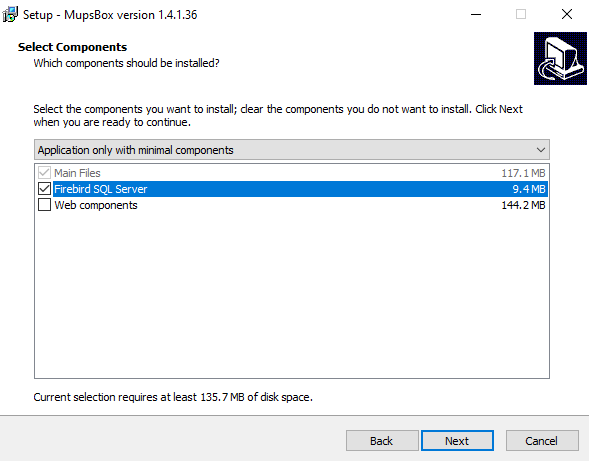
On select components page can be chosen custom next options:
- Main Files - the core of application.
- Firebird SQL Server - Database, that keep information data of application. During update process installer will be compare current database SQL server and new one.
- Web components - Not necessary components for new web features.
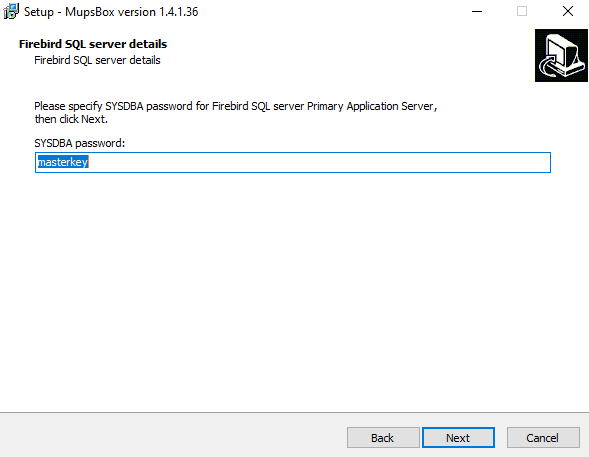
During first installation, if Firebird SQL served was not installed and select component was checked, application provide page for fill SYSDBA password for new instance.
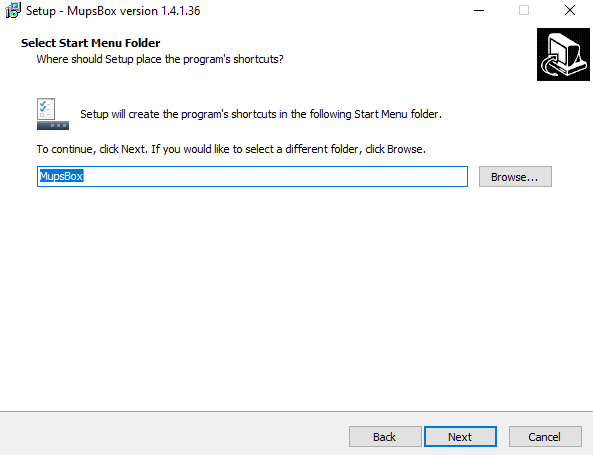
Select Start Menu folder:
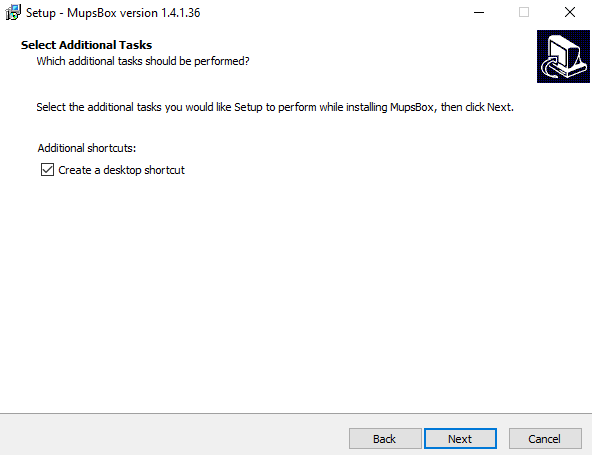
Create desktop shortcut
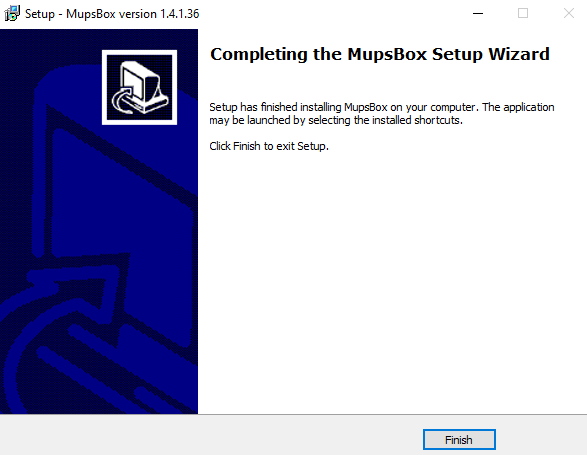
After progress installation, installer show
Using Firebird 3.x
There is a Firebird database used to store data like connection data to devices, temporary data, statistical data, etc. MupsBox uses version 3.x. Firebird can be installed using application installer or manually. When you run manual installation, select a language, accept the terms of the agreement, select the installation folder, select which components to install (you can leave the default), create shortcuts in the menu, select additional tasks ( can be left by default).
Warning: Firebird 2.5 database support terminated. Firebird 4.0 database support not optimized. Please use only 3.0 version.
The location of the program on the server.
You need to place the executable program files in the same folder with the following files
Attention: If your antivirus warns that one of our services is Trojan or Malware, send these files to the antivirus vendor so that they add their signatures to the exceptions. We do not have Trojans and other filth.
There is some of main files of application:
- MupsBox.exe - is the main application, a device management GUI application.
- MBTrafficser.exe - is a service for regularly receiving Traffic Accounting data.
- MBBackupService.exe - is a service for running backup tasks.
- MBFtpService.exe - is a service for running an ftp server on your PC.
- MBSyslogService.exe - is a data collection service for the Syslog module.
- MBPoolingService.exe - A service that polls devices for a given timer.
- Config.ini - application configuration file.
- MBDB.FDB - application database file.
- Fbclient.dll - is an application and database interaction library.
- deftitle.rtf - File for editing the report title
- defbottom.rtf - File for editing report style
- ssleay32.dll and libeay32.dll - SSL libraries
- libssh2.dll and libcrypto-1_1-x64.dll - library for the client part of sftp
- msvcp110.dll, vcruntime140.dll, msvcr110.dll, msvcr100.dll - supporting libraries
First start
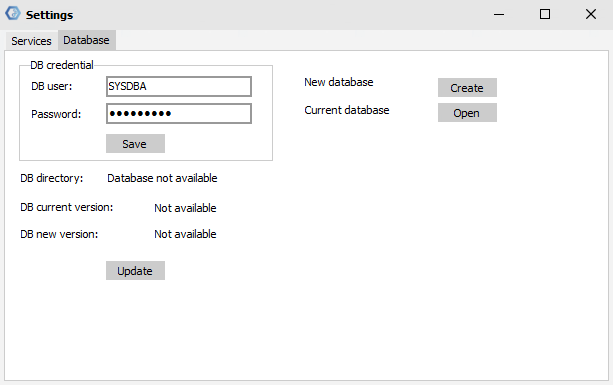
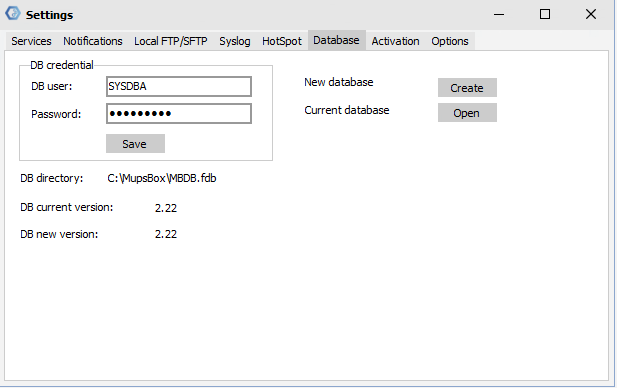
When you first start MupsBox.exe, you should create a new database or open an existing database.
If you are installing the program for the first time, then click Create. If you already have a database, click Open.
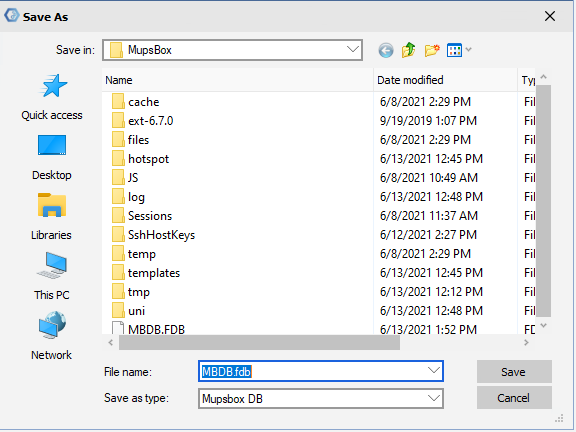
After clicking on the selected button, a window will appear, where you need to select the path and name to save or open your database.
After you have chosen a place to create or open your database and give it a name, click the Save or Open button. And you will see that the database was created (opened) as in the image below.
Before install services
It's necessary to configure settings for services Syslog, FTP and also configure notifications.
The application provide different type of notification: via mail, via sms, via telegram
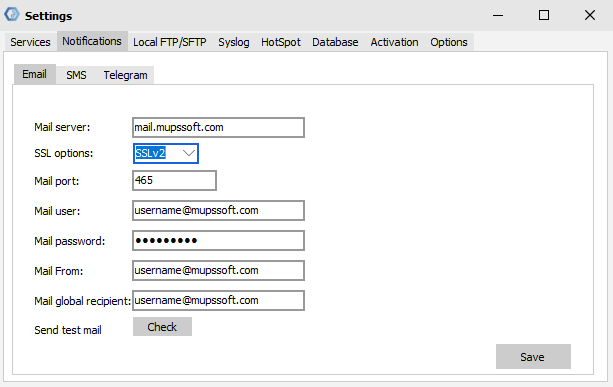
Notifications via mail
Mail server - your mail server
SSL options - choose appropriate method of security: SSLv2, SSLv23, SSLv3, TLSv1, TLSv1.1, TLSv.1.2 or without SSL option.
Mail port - port without SSL
Mail user - username to logon to mail server
Mail password - password for your username
Mail From - Custom MAIL FROM
Mail global recipient - mail to send all notifications(can be redefined in jobs)
Check - MupsBox will send a test email
Save - save your settings for notifications
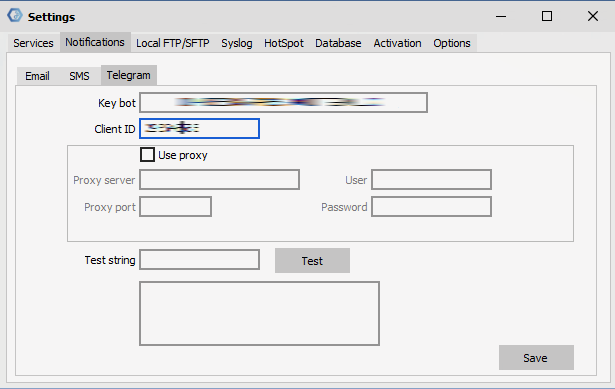
Notifications via telegram
Key bot - link on telegram channel
Client id - Id that new massages should be send.
use proxy - use proxy setting for send messages
Proxy server - proxy server for send telegram messages
Proxy port - port of proxy server for send telegram messages
User - user on proxy server for send telegram messages
Password - password on proxy server for send telegram messages
Test string - Send a test telegram string
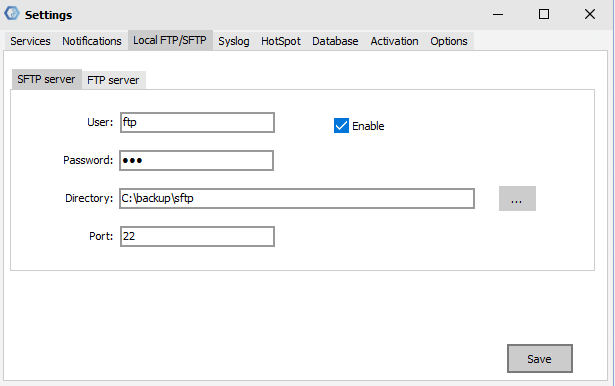
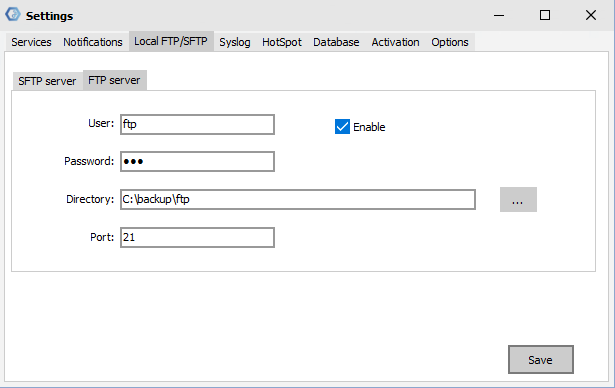
Local FTP/SFTP
By default, please use SFTP service for your goals.
User - username to connect to the local SFTP or FTP service
Password - Password to connect to the local SFTP or FTP service
Directory - Folder in which they will connect via SFTP or FTP
Port - SFTP / FTP - port
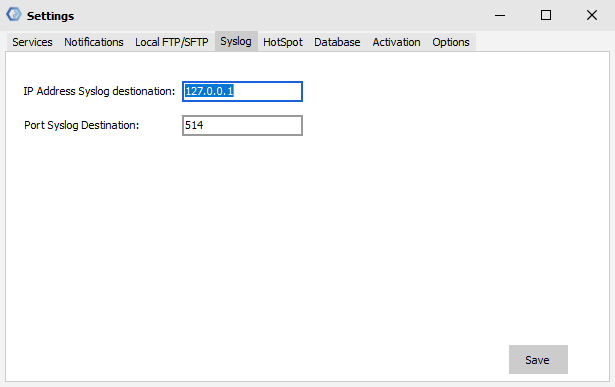
Syslog
127.0.0.1 - your local IP or your IP address to listen all by UDP
514 - UDP port to listen to messages
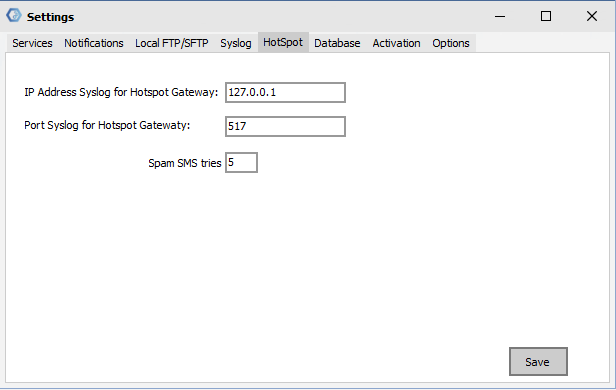
HotSpot
IP Address Syslog for Hotspot gateway - your local IP or your IP address to listen all by UDP
Port Syslog for Hotspot Gateway - UDP port to listen to messages. Warning: The port must be different from the port for syslog
Spam SMS tries - counts of fail tries to use SMS authentication. After threshold, mac address will add to black list.
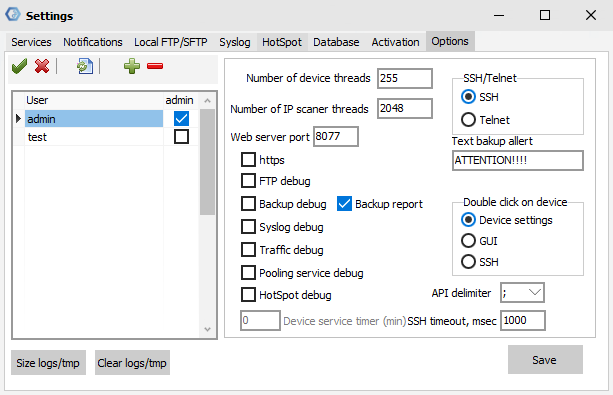
Options
Number of device threads - How many threads to use for polling devices
Number of IP scanner threads - How many threads to use to search for devices
Web server port - port on which the web server will be launched
* debug - additional logs for services
Device service timer (min) - how often to automatically poll devices
Double click on device - choose what will happen when you double-click or when you click on enter
SSH/Telnet - which application will open when you click on the button

Text Backup alert - Adds a warning with the given text to the message body
Size logs/tmp - shows folder size
Clear logs/tmp - clears all contents of folders
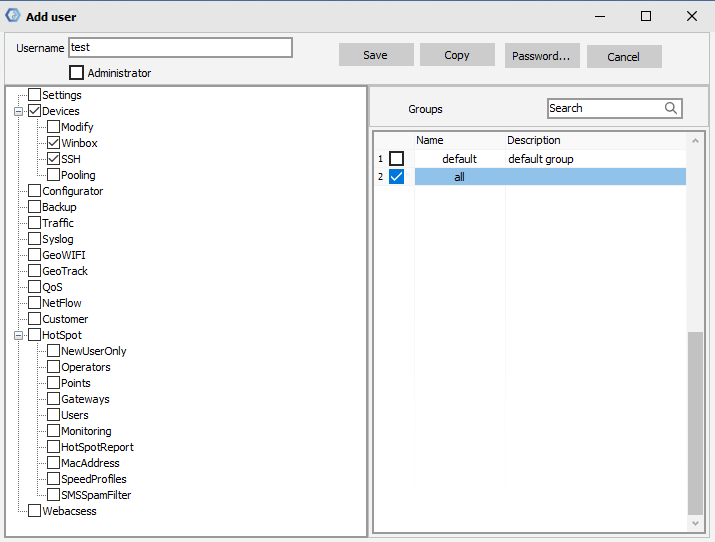
Users and permissions
When you click on the ![]() button, you can add a user with defined access rights to the application.
button, you can add a user with defined access rights to the application.
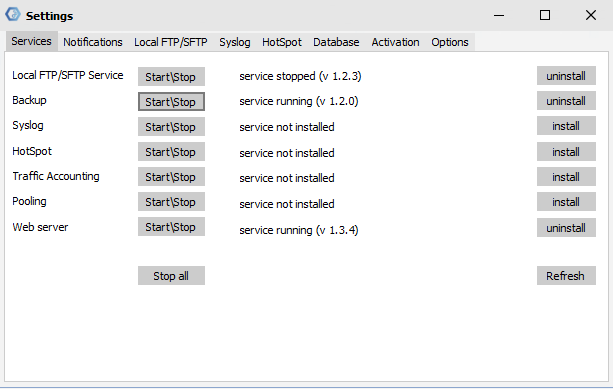
Install and Start services
To install the service, you must click on the install button next to the name of the service.
To start the service, you must click on the start button next to the name of the service.
How to Upgrade MupsBox
The first step is to stop all services.
Next, you need to uninstall all services.
After downloading the archive of the new version of the program.
Unpack the contents of the archive into the folder where MupsBox software is installed.
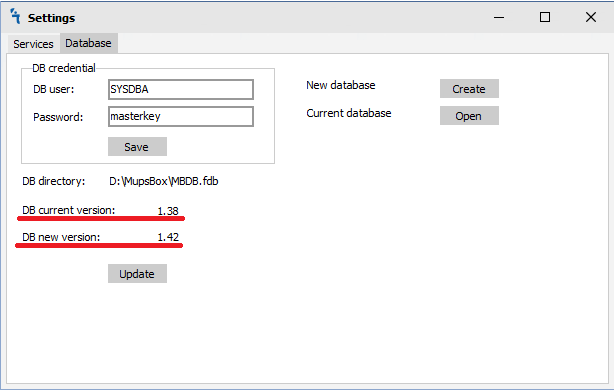
After starting the program, the system will offer you to update the database. Click Update.
After updating the database, install and start the services.
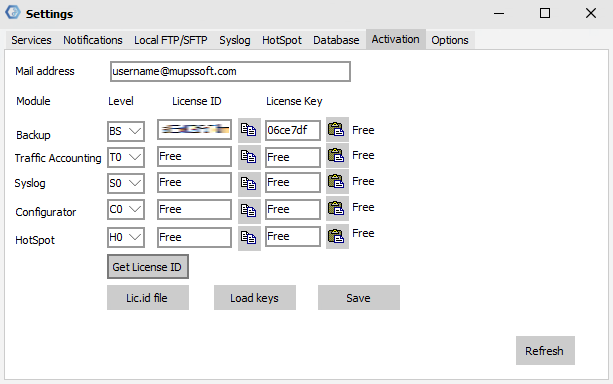
Activation
Activation shows what level of license is installed in your copy of the MupsBOX program. To activate your license level, you need to fill your real email address, select the license level of the module you want to activate and click Save Level. After that, you need to generate your License ID by clicking the Get License ID button, you will receive a unique identifier that you need to send to email support@mupssoft.com, our specialists will generate a key that will send you back to email. The resulting key must be placed in the License key field, click the Save button and restart the program.
There is faster way for provide license ID information. The lic.id file button provide save license for all modules to file. Then send file to email support@mupssoft.com, our specialists will generate a key file that will send you back to email. Then you use Load key button for fill license keys for each modules.
