Difference between revisions of "Device configuration for MupsBox"
| Line 5: | Line 5: | ||
<h2>'''Vendor Configuration'''</h2> | <h2>'''Vendor Configuration'''</h2> | ||
| − | < | + | <h2>'''Cisco - IOS v15'''</h2>Minimum* configuration: |
'''BASIC ETHERNET CONFIGURATION - SUMMARY STEPS''' | '''BASIC ETHERNET CONFIGURATION - SUMMARY STEPS''' | ||
| Line 269: | Line 269: | ||
| − | < | + | <h2>'''Cisco - IOS L2 v15'''</h2> |
| − | <p> | + | <p>Minimum* configuration:</p> |
'''BASIC ETHERNET CONFIGURATION - SUMMARY STEPS''' | '''BASIC ETHERNET CONFIGURATION - SUMMARY STEPS''' | ||
| − | 1. | + | 1. Switch> '''enable''' |
| − | 2. | + | 2. Switch# '''configure terminal''' |
| − | 3. | + | 3. Switch(config)# '''interface gigabitethernet''' 0/0 |
| − | 4. | + | 4. Switch(config-if)# '''no switchport''' |
| − | 5. | + | 5. Switch(config-if)# '''ip adress''' 10.9.90.201 255.255.255.0 |
| − | 6. | + | 6. Switch(config-if)# '''exit''' |
| − | 7. | + | 7. Switch(config)# '''ip default-gateway''' 10.9.90.1 |
| Line 544: | Line 544: | ||
font-size:8pt; font-face:verdana,sans-serif; border:0.2em outset #ceebf7; | font-size:8pt; font-face:verdana,sans-serif; border:0.2em outset #ceebf7; | ||
padding:0.1em; font-weight:bolder; -moz-border-radius:8px; "> | padding:0.1em; font-weight:bolder; -moz-border-radius:8px; "> | ||
| − | [[#top| Back to the Top ]]</span></div><div id="turnkey-credit"> <div style="clear: both;"> [https://www.turnkeylinux.org/mediawiki MediaWiki Appliance] - Powered by [https://www.turnkeylinux.org TurnKey Linux] </div> </div><div id="turnkey-credit"> <div style="clear: both;"> [https://www.turnkeylinux.org/mediawiki MediaWiki Appliance] - Powered by [https://www.turnkeylinux.org TurnKey Linux] </div> </div><div id="turnkey-credit"> <div style="clear: both;"> [https://www.turnkeylinux.org/mediawiki MediaWiki Appliance] - Powered by [https://www.turnkeylinux.org TurnKey Linux] </div> </div><div id="turnkey-credit"> <div style="clear: both;"> [https://www.turnkeylinux.org/mediawiki MediaWiki Appliance] - Powered by [https://www.turnkeylinux.org TurnKey Linux] </div> </div><div id="turnkey-credit"> <div style="clear: both;"> [https://www.turnkeylinux.org/mediawiki MediaWiki Appliance] - Powered by [https://www.turnkeylinux.org TurnKey Linux] </div> </div><div id="turnkey-credit"> <div style="clear: both;"> [https://www.turnkeylinux.org/mediawiki MediaWiki Appliance] - Powered by [https://www.turnkeylinux.org TurnKey Linux] </div> </div><div id="turnkey-credit"> <div style="clear: both;"> [https://www.turnkeylinux.org/mediawiki MediaWiki Appliance] - Powered by [https://www.turnkeylinux.org TurnKey Linux] </div> </div><div id="turnkey-credit"> <div style="clear: both;"> [https://www.turnkeylinux.org/mediawiki MediaWiki Appliance] - Powered by [https://www.turnkeylinux.org TurnKey Linux] </div> </div><div id="turnkey-credit"> <div style="clear: both;"> [https://www.turnkeylinux.org/mediawiki MediaWiki Appliance] - Powered by [https://www.turnkeylinux.org TurnKey Linux] </div> </div><div id="turnkey-credit"> <div style="clear: both;"> [https://www.turnkeylinux.org/mediawiki MediaWiki Appliance] - Powered by [https://www.turnkeylinux.org TurnKey Linux] </div> </div><div id="turnkey-credit"> <div style="clear: both;"> [https://www.turnkeylinux.org/mediawiki MediaWiki Appliance] - Powered by [https://www.turnkeylinux.org TurnKey Linux] </div> </div><div id="turnkey-credit"> <div style="clear: both;"> [https://www.turnkeylinux.org/mediawiki MediaWiki Appliance] - Powered by [https://www.turnkeylinux.org TurnKey Linux] </div> </div><div id="turnkey-credit"> <div style="clear: both;"> [https://www.turnkeylinux.org/mediawiki MediaWiki Appliance] - Powered by [https://www.turnkeylinux.org TurnKey Linux] </div> </div><div id="turnkey-credit"> <div style="clear: both;"> [https://www.turnkeylinux.org/mediawiki MediaWiki Appliance] - Powered by [https://www.turnkeylinux.org TurnKey Linux] </div> </div><div id="turnkey-credit"> <div style="clear: both;"> [https://www.turnkeylinux.org/mediawiki MediaWiki Appliance] - Powered by [https://www.turnkeylinux.org TurnKey Linux] </div> </div><div id="turnkey-credit"> <div style="clear: both;"> [https://www.turnkeylinux.org/mediawiki MediaWiki Appliance] - Powered by [https://www.turnkeylinux.org TurnKey Linux] </div> </div><div id="turnkey-credit"> <div style="clear: both;"> [https://www.turnkeylinux.org/mediawiki MediaWiki Appliance] - Powered by [https://www.turnkeylinux.org TurnKey Linux] </div> </div><div id="turnkey-credit"> <div style="clear: both;"> [https://www.turnkeylinux.org/mediawiki MediaWiki Appliance] - Powered by [https://www.turnkeylinux.org TurnKey Linux] </div> </div><div id="turnkey-credit"> <div style="clear: both;"> [https://www.turnkeylinux.org/mediawiki MediaWiki Appliance] - Powered by [https://www.turnkeylinux.org TurnKey Linux] </div> </div> | + | [[#top| Back to the Top ]]</span></div><div id="turnkey-credit"> <div style="clear: both;"> [https://www.turnkeylinux.org/mediawiki MediaWiki Appliance] - Powered by [https://www.turnkeylinux.org TurnKey Linux] </div> </div><div id="turnkey-credit"> <div style="clear: both;"> [https://www.turnkeylinux.org/mediawiki MediaWiki Appliance] - Powered by [https://www.turnkeylinux.org TurnKey Linux] </div> </div><div id="turnkey-credit"> <div style="clear: both;"> [https://www.turnkeylinux.org/mediawiki MediaWiki Appliance] - Powered by [https://www.turnkeylinux.org TurnKey Linux] </div> </div><div id="turnkey-credit"> <div style="clear: both;"> [https://www.turnkeylinux.org/mediawiki MediaWiki Appliance] - Powered by [https://www.turnkeylinux.org TurnKey Linux] </div> </div><div id="turnkey-credit"> <div style="clear: both;"> [https://www.turnkeylinux.org/mediawiki MediaWiki Appliance] - Powered by [https://www.turnkeylinux.org TurnKey Linux] </div> </div><div id="turnkey-credit"> <div style="clear: both;"> [https://www.turnkeylinux.org/mediawiki MediaWiki Appliance] - Powered by [https://www.turnkeylinux.org TurnKey Linux] </div> </div><div id="turnkey-credit"> <div style="clear: both;"> [https://www.turnkeylinux.org/mediawiki MediaWiki Appliance] - Powered by [https://www.turnkeylinux.org TurnKey Linux] </div> </div><div id="turnkey-credit"> <div style="clear: both;"> [https://www.turnkeylinux.org/mediawiki MediaWiki Appliance] - Powered by [https://www.turnkeylinux.org TurnKey Linux] </div> </div><div id="turnkey-credit"> <div style="clear: both;"> [https://www.turnkeylinux.org/mediawiki MediaWiki Appliance] - Powered by [https://www.turnkeylinux.org TurnKey Linux] </div> </div><div id="turnkey-credit"> <div style="clear: both;"> [https://www.turnkeylinux.org/mediawiki MediaWiki Appliance] - Powered by [https://www.turnkeylinux.org TurnKey Linux] </div> </div><div id="turnkey-credit"> <div style="clear: both;"> [https://www.turnkeylinux.org/mediawiki MediaWiki Appliance] - Powered by [https://www.turnkeylinux.org TurnKey Linux] </div> </div><div id="turnkey-credit"> <div style="clear: both;"> [https://www.turnkeylinux.org/mediawiki MediaWiki Appliance] - Powered by [https://www.turnkeylinux.org TurnKey Linux] </div> </div><div id="turnkey-credit"> <div style="clear: both;"> [https://www.turnkeylinux.org/mediawiki MediaWiki Appliance] - Powered by [https://www.turnkeylinux.org TurnKey Linux] </div> </div><div id="turnkey-credit"> <div style="clear: both;"> [https://www.turnkeylinux.org/mediawiki MediaWiki Appliance] - Powered by [https://www.turnkeylinux.org TurnKey Linux] </div> </div><div id="turnkey-credit"> <div style="clear: both;"> [https://www.turnkeylinux.org/mediawiki MediaWiki Appliance] - Powered by [https://www.turnkeylinux.org TurnKey Linux] </div> </div><div id="turnkey-credit"> <div style="clear: both;"> [https://www.turnkeylinux.org/mediawiki MediaWiki Appliance] - Powered by [https://www.turnkeylinux.org TurnKey Linux] </div> </div><div id="turnkey-credit"> <div style="clear: both;"> [https://www.turnkeylinux.org/mediawiki MediaWiki Appliance] - Powered by [https://www.turnkeylinux.org TurnKey Linux] </div> </div><div id="turnkey-credit"> <div style="clear: both;"> [https://www.turnkeylinux.org/mediawiki MediaWiki Appliance] - Powered by [https://www.turnkeylinux.org TurnKey Linux] </div> </div><div id="turnkey-credit"> <div style="clear: both;"> [https://www.turnkeylinux.org/mediawiki MediaWiki Appliance] - Powered by [https://www.turnkeylinux.org TurnKey Linux] </div> </div><div id="turnkey-credit"> <div style="clear: both;"> [https://www.turnkeylinux.org/mediawiki MediaWiki Appliance] - Powered by [https://www.turnkeylinux.org TurnKey Linux] </div> </div> |
Revision as of 23:11, 8 June 2021
Device Configuration
Introduction
This section is not a tutorial on configuration different manufacturers. Here you will find the minimum settings in the CLI (for access from MUPSBOX to devices).
Vendor Configuration
Cisco - IOS v15
Minimum* configuration:
BASIC ETHERNET CONFIGURATION - SUMMARY STEPS
1. Router> enable
2. Router# configure terminal
3. Router(config)# interface gigabitethernet 0/0
4. Router(config-if)# ip adress 10.9.90.201 255.255.255.0
5. Router(config-if)# no shutdown
6. Router(config-if)# exit
7. Router(config)# ip route 0.0.0.0 0.0.0.0 10.9.90.1
BASIC SSH CONFIGURATION - SUMMARY STEPS
8. Router(config)# ip domain name domain.local
9. Router(config)# hostname MBRouter
10. MBRouter(config)# crypto key generate rsa modulus 1024
11. MBRouter(config)# username root privilege 15 secret PassW0rd
12. MBRouter(config)# aaa new-model
13. MBRouter(config)# line vty 0 4
14. MBRouter(config-line)# transport input ssh
MBRouter(config-line)# exit
ADDITIONAL CONFIGURATION - SUMMARY STEPS
15. MBRouter(config)# enable secret PassW0rd
16. MBRouter(config)# service password-encryption
17. MBRouter(config)# end
18. MBRouter# copy running-config startup-config
| Comman or Action | Purpose | |
|---|---|---|
| Step 1 | enable
Example: Router> enable |
Enables privileged EXEC mode.
|
| Step 2 | configure terminal
Example: Router# configure terminal |
Enters global configuration mode. |
| Step 3 | interface gigabitethernet slot/port
Router(config)# interface gigabitethernet 0/0 |
Specify the port adapter type and the location of the interface to be configured. |
| Step 4 | ip address ip subnetmask
Example: Router(config-if)# ip address 10.9.90.201 255.255.255.0 |
Sets the IP address and subnet mask for the specified GE interface. |
| Step 5 | no shutdown
Example: Router(config-if)# no shutdown |
Enables the GE interface, changing its state from administratively down to administratively up |
| Step 6 | exit
Example: Router(config-if)# exit |
Exits configuration mode for the GE interface and returns to global configuration mode. |
| Step 7 | ip route 0.0.0.0 0.0.0.0 gateway
Example: Router(config)# ip route 0.0.0.0 0.0.0.0 10.9.90.1 |
Add route - default gateway |
| Comman or Action | Purpose | |
|---|---|---|
| Step 8 | ip domain name domain name
Example: Router(config)# ip domain name domain.local |
Specifies the default domain name that Cisco IOS software uses to complete unqualified host names
|
| Step 9 | hostname newhostname
Router(config)# hostname MBRouter |
Specifies the name for the router. |
| Step 10 | crypto key generate rsa modulus 1024
MBRouter(config)# crypto key generate rsa modulus 1024 |
To generate Rivest, Shamir, and Adelman (RSA) key pairs. |
| Step 11 | username root privilege 15 secret PassW0rd
Example: MBRouter(config)# username root privilege 15 secret PassW0rd |
Specifies the secret for the root. |
| Step 12 | aaa new-model
Example: MBRouter(config)# aaa new-model |
Enable AAA on router. |
| Step 13 | line vty 0 4
Example: MBRouter(config)# line vty 0 4 |
Entering the configuration mode VTY is a virtual port and used to get Telnet or SSH access to the device. |
| Step 14 | transport input ssh
MBRouter(config-line)# transport input ssh MBRouter(config-line)# exit |
Accept only ssh via vty line. |
| Comman or Action | Purpose | |
|---|---|---|
| Step 15 | enable secret PassW0rd
Example: MBRouter(config)# enable secret PassW0rd |
Defines a new password or changes an existing password for access to privileged EXEC mode.
|
| Step 16 | service password-encryption
Example: MBRouter(config)# service password-encryption |
(Optional) Encrypts the password when the
password is defined or when the configuration is written Encryption prevents the password from being readable in the configuration file. |
| Step 17 | end
Example: MBRouter(config)# end |
Exits global configuration mode and returns to privileged EXEC mode. |
| Step 18 | copy running-config startup-config
Example: MBrouter# copy running-config startup-config |
Saves the running configuration file as the startup configuration file. |
MupsBox will sort the data and display only the values found. These data can be exported to Excel for further processing.
Cisco - IOS L2 v15
Minimum* configuration:
BASIC ETHERNET CONFIGURATION - SUMMARY STEPS
1. Switch> enable
2. Switch# configure terminal
3. Switch(config)# interface gigabitethernet 0/0
4. Switch(config-if)# no switchport
5. Switch(config-if)# ip adress 10.9.90.201 255.255.255.0
6. Switch(config-if)# exit
7. Switch(config)# ip default-gateway 10.9.90.1
BASIC SSH CONFIGURATION - SUMMARY STEPS
8. Router(config)# ip domain name domain.local
9. Router(config)# hostname MBRouter
10. MBRouter(config)# crypto key generate rsa modulus 1024
11. MBRouter(config)# username root privilege 15 secret PassW0rd
12. MBRouter(config)# aaa new-model
13. MBRouter(config)# line vty 0 4
14. MBRouter(config-line)# transport input ssh
MBRouter(config-line)# exit
ADDITIONAL CONFIGURATION - SUMMARY STEPS
15. MBRouter(config)# enable secret PassW0rd
16. MBRouter(config)# service password-encryption
17. MBRouter(config)# end
18. MBRouter# copy running-config startup-config
| Comman or Action | Purpose | |
|---|---|---|
| Step 1 | enable
Example: Router> enable |
Enables privileged EXEC mode.
|
| Step 2 | configure terminal
Example: Router# configure terminal |
Enters global configuration mode. |
| Step 3 | interface gigabitethernet slot/port
Router(config)# interface gigabitethernet 0/0 |
Specify the port adapter type and the location of the interface to be configured. |
| Step 4 | ip address ip subnetmask
Example: Router(config-if)# ip address 10.9.90.201 255.255.255.0 |
Sets the IP address and subnet mask for the specified GE interface. |
| Step 5 | no shutdown
Example: Router(config-if)# no shutdown |
Enables the GE interface, changing its state from administratively down to administratively up |
| Step 6 | exit
Example: Router(config-if)# exit |
Exits configuration mode for the GE interface and returns to global configuration mode. |
| Step 7 | ip route 0.0.0.0 0.0.0.0 gateway
Example: Router(config)# ip route 0.0.0.0 0.0.0.0 10.9.90.1 |
Add route - default gateway |
| Comman or Action | Purpose | |
|---|---|---|
| Step 8 | ip domain name domain name
Example: Router(config)# ip domain name domain.local |
Specifies the default domain name that Cisco IOS software uses to complete unqualified host names
|
| Step 9 | hostname newhostname
Router(config)# hostname MBRouter |
Specifies the name for the router. |
| Step 10 | crypto key generate rsa modulus 1024
MBRouter(config)# crypto key generate rsa modulus 1024 |
To generate Rivest, Shamir, and Adelman (RSA) key pairs. |
| Step 11 | username root privilege 15 secret PassW0rd
Example: MBRouter(config)# username root privilege 15 secret PassW0rd |
Specifies the secret for the root. |
| Step 12 | aaa new-model
Example: MBRouter(config)# aaa new-model |
Enable AAA on router. |
| Step 13 | line vty 0 4
Example: MBRouter(config)# line vty 0 4 |
Entering the configuration mode VTY is a virtual port and used to get Telnet or SSH access to the device. |
| Step 14 | transport input ssh
MBRouter(config-line)# transport input ssh MBRouter(config-line)# exit |
Accept only ssh via vty line. |
| Comman or Action | Purpose | |
|---|---|---|
| Step 15 | enable secret PassW0rd
Example: MBRouter(config)# enable secret PassW0rd |
Defines a new password or changes an existing password for access to privileged EXEC mode.
|
| Step 16 | service password-encryption
Example: MBRouter(config)# service password-encryption |
(Optional) Encrypts the password when the
password is defined or when the configuration is written Encryption prevents the password from being readable in the configuration file. |
| Step 17 | end
Example: MBRouter(config)# end |
Exits global configuration mode and returns to privileged EXEC mode. |
| Step 18 | copy running-config startup-config
Example: MBrouter# copy running-config startup-config |
Saves the running configuration file as the startup configuration file. |
Cisco - IOS L2 v12
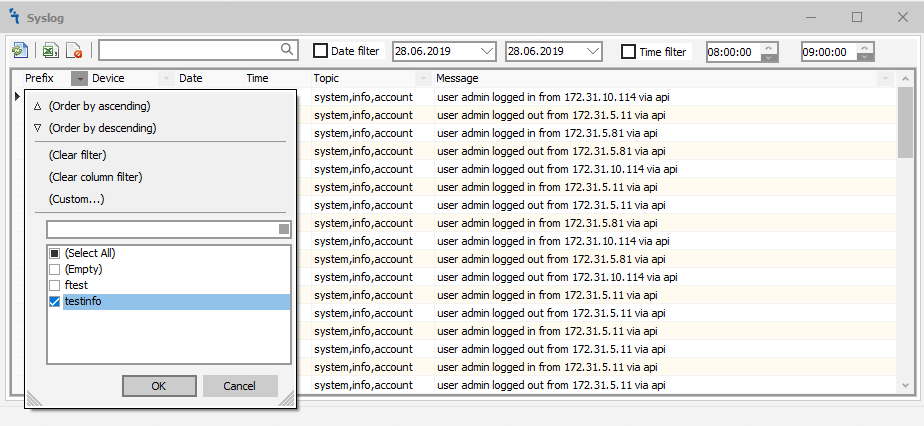
To filter by prefix, click the down arrow in the prefix field, as shown in the figure below and select the prefix or prefixes by which you need to filter the data.
To filter by device and topic, do the same.
Cisco - ASA
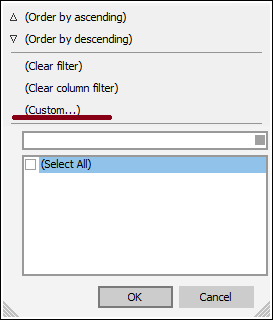
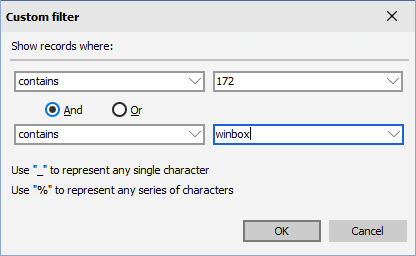
For more flexible filtering, use a custom filter.


