Difference between revisions of "Devices Module"
| (32 intermediate revisions by 2 users not shown) | |||
| Line 1: | Line 1: | ||
<h1>'''Device List'''</h1> | <h1>'''Device List'''</h1> | ||
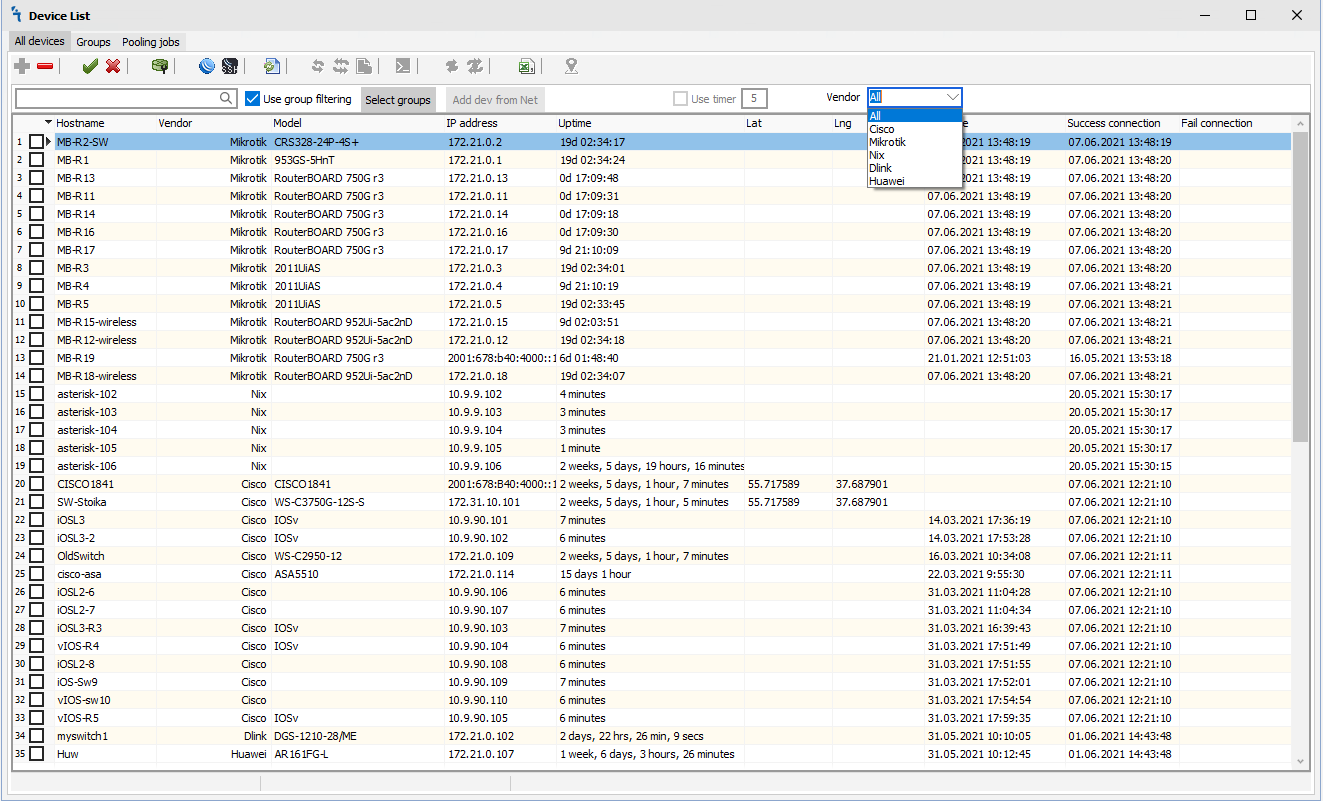
<p>It is used to add devices to the database and group them according to the selected attribute. Further, when using other modules of mupsbox, we will work with groups of devices.</p> | <p>It is used to add devices to the database and group them according to the selected attribute. Further, when using other modules of mupsbox, we will work with groups of devices.</p> | ||
| − | [[File:device-list.png|Device List]] | + | [[File:device-listNew.png|Device List All]]<br> |
| − | + | [[File:device-list-Mikrotik.png|Device List Mikrotik]]<br> | |
| + | [[File:device-list-Cisco.png|Device List Cisco]]<br> | ||
| + | [[File:device-list-Nix.png|Device List Nix]]<br> | ||
<p><ul> | <p><ul> | ||
On the Device List tab, there are buttons (from left to right):<br> | On the Device List tab, there are buttons (from left to right):<br> | ||
| Line 23: | Line 25: | ||
<li>[[File:exel.png|Export the visible list of devices in Excel]] - Export the visible list of devices in Excel<br></li> | <li>[[File:exel.png|Export the visible list of devices in Excel]] - Export the visible list of devices in Excel<br></li> | ||
<li>[[File:device-geo.png|Geolocation by coordinates]] - Geolocation by coordinates<br></li> | <li>[[File:device-geo.png|Geolocation by coordinates]] - Geolocation by coordinates<br></li> | ||
| + | <li>[[File:device-over.png|re-read and overwrite data of selected devices]] - re-read and overwrite data of selected devices<br></li> | ||
| + | <li>[[File:device-over-all.png|re-read and overwrite data of all devices]] - re-read and overwrite data of all devices<br></li> | ||
| + | <li>[[File:upgrade_lte.png|Upgrade LTE modem]] - Upgrade LTE modem<br></li> | ||
</ul></p> | </ul></p> | ||
| Line 29: | Line 34: | ||
[[File:add-device.png|Add Device]] | [[File:add-device.png|Add Device]] | ||
[[File:add-device-gps.png|Add Device GPS tab]] | [[File:add-device-gps.png|Add Device GPS tab]] | ||
| + | [[File:add-device-lte.png|Add Device LTE tab]] | ||
| + | |||
<p><ul> | <p><ul> | ||
<li>Hostname - Any convenient device name.<br></li> | <li>Hostname - Any convenient device name.<br></li> | ||
| − | |||
| − | |||
<li>Username - Username to login to device.<br></li> | <li>Username - Username to login to device.<br></li> | ||
<li>Password - Password to login to device.<br></li> | <li>Password - Password to login to device.<br></li> | ||
| − | <li> | + | <li>IP / AD - Device IP address.<br></li> |
| + | <li>Connect via - connecting to the device via<br></li> | ||
<li>SSH port - Your ssh port, which you registered in Ip -> Services <br></li> | <li>SSH port - Your ssh port, which you registered in Ip -> Services <br></li> | ||
<li>FTP port - Your ftp port, which you registered in Ip -> Services <br></li> | <li>FTP port - Your ftp port, which you registered in Ip -> Services <br></li> | ||
| − | <li>Telnet port - Your telnet port | + | <li>Telnet port - Your telnet port<br></li> |
| + | <li>Winbox port - Your winbox port<br></li> | ||
| + | <li>API SSL port - Your API SSL port<br></li> | ||
| + | <li>API SSL - Your API port<br></li> | ||
<li>Version package channel - Your version package channel on royter <br></li> | <li>Version package channel - Your version package channel on royter <br></li> | ||
<li>Join in group - Select the groups to which the device will belong.<br></li> | <li>Join in group - Select the groups to which the device will belong.<br></li> | ||
| Line 45: | Line 54: | ||
<li>Copy - If you have many devices with the same data, and differ only in Hostname and IP address, use the copy button to speed up the process of making devices.<br></li> | <li>Copy - If you have many devices with the same data, and differ only in Hostname and IP address, use the copy button to speed up the process of making devices.<br></li> | ||
<li>Comment - Comment on the device.<br></li> | <li>Comment - Comment on the device.<br></li> | ||
| + | <li>GPS tab - you can enter the coordinates and address of the location of the device in order to display it on the map in the GeoTrack module<br></li> | ||
| + | <li>LTE tab - If your device has an LTE modem, specify them for the possibility of updating (At the moment it works only for Mikrotik devices)<br></li> | ||
</ul></p> | </ul></p> | ||
| Line 68: | Line 79: | ||
<p>Having sorted the devices by a certain attribute, you can export the sorted list to Excel by pressing the [[File:exel.png|Export the visible list of devices in Excel]] button.</p> | <p>Having sorted the devices by a certain attribute, you can export the sorted list to Excel by pressing the [[File:exel.png|Export the visible list of devices in Excel]] button.</p> | ||
<p>To filter devices by groups, check the box to use group filtering. To select filtering conditions by group, click the Select groups button. The following window will appear:</p> | <p>To filter devices by groups, check the box to use group filtering. To select filtering conditions by group, click the Select groups button. The following window will appear:</p> | ||
| − | [[File:device-list-group- | + | [[File:device-list-group-filter2.png|Device List Group Filter]] |
<p>Check the box next to the group (s) you want to display. If you check a NOT IN, it will show all devices that are not included in the marked group.</p> | <p>Check the box next to the group (s) you want to display. If you check a NOT IN, it will show all devices that are not included in the marked group.</p> | ||
<p>To navigate through the devices, you can use the up and down navigation keys. Clicking Enter on the selected device opens a window with its data. Clicking delete the program will prompt you to delete the selected device or selected devices. To select devices, use shift and ctrl keys. You can select devices with the left mouse button, deselect with the right.</p> | <p>To navigate through the devices, you can use the up and down navigation keys. Clicking Enter on the selected device opens a window with its data. Clicking delete the program will prompt you to delete the selected device or selected devices. To select devices, use shift and ctrl keys. You can select devices with the left mouse button, deselect with the right.</p> | ||
<br> | <br> | ||
| − | <p>'''Customize Device List'''</p> | + | <h3><p>'''Customize Device List'''</p></h3> |
<p>To turn off unnecessary columns, click the down arrow next to the hostname column. As shown in the picture below. Use the mouse to select the columns you want to disable or enable for viewing.</p> | <p>To turn off unnecessary columns, click the down arrow next to the hostname column. As shown in the picture below. Use the mouse to select the columns you want to disable or enable for viewing.</p> | ||
| − | [[File:customize-device- | + | [[File:customize-device-list2.png|Customize Device List]] |
<h2>'''Add device from Net'''</h2> | <h2>'''Add device from Net'''</h2> | ||
<p>Search and add Mikrotik devices in automatic mode.</p> | <p>Search and add Mikrotik devices in automatic mode.</p> | ||
| − | [[File:add-dev-from-net.png|Add device from Net]] | + | [[File:add-dev-from-net2.png|Add device from Net by API]] |
| + | [[File:add-dev-from-net-ssh.png|Add device from Net by SSH]] | ||
<p><ul> | <p><ul> | ||
<li>IP - subnet.<br></li> | <li>IP - subnet.<br></li> | ||
| Line 113: | Line 125: | ||
[[File:cmd-window-commands.png|CMD work space]] | [[File:cmd-window-commands.png|CMD work space]] | ||
<p>If you entered several commands in a row, you can navigate between them using the up and down arrows</p> | <p>If you entered several commands in a row, you can navigate between them using the up and down arrows</p> | ||
| + | |||
| + | <h2>'''Command line (API samples)'''</h2> | ||
| + | <p>Using api - you get feedback. This is very important because you will always know if the command was executed successfully. Also, you get the opportunity to build reports using API: request->response. Here are some examples.</p> | ||
| + | <br> | ||
| + | <p><b>add new user</b></p> | ||
| + | <p>/user/add<br>=name=username<br>=group=full<br>=password=userpassword<br>=comment=this is new user</p> | ||
| + | |||
| + | <p><b>remove user</b></p> | ||
| + | <p>/user/remove<br>=.id=username</p> | ||
| + | |||
| + | <p><b>on which router is the user 'admin'?</b></p> | ||
| + | <p>/user/print<br>?name=admin<br>mbcount==1</p> | ||
| + | |||
| + | <p><b>on which router firewall is not configured, for example, rules < 3 ?</b></p> | ||
| + | <p>/ip/firewall/filter/print<br>mbcount=<3</p> | ||
| + | |||
| + | <p><b>disable all rules in /ip/firewall/filter where chain=input and action=drop</b></p> | ||
| + | <p>/ip/firewall/filter/disable<br>?chain=input<br>?action=drop<br>?#&<br>mbgetid</p> | ||
| + | |||
| + | <p><b>on which router is dns server 8.8.4.4 configured?</b></p> | ||
| + | <p>/ip/dns/print<br>mb?servers=8.8.4.4</p> | ||
| + | |||
| + | <br> | ||
| + | <div id="shbox" style=" border-width:1px; border-color:lightgrey; padding: 2px 5px 2px 10px; min-height:56px; border-style:solid; font-size: 0.9em;"> | ||
| + | [[File:Icon-warn.png|left|56px|56px]] | ||
| + | <p style="margin-top:10px; margin-left: 56px;"><b style="color:green;">Notice:</b> <b>mbcount</b> - proproetary function mupsbox, gets counts data replies (!re),mbcount= (=x, >x , <x, ==x, =>x, =<x). <b>mbgetid</b> - allows you to combine several commands: perform an action with a preliminary request to get id, execute a print query c .proplist = .id, storing the result in the array and then performing the desired action. <b>mb?</b>filed - allows you to build queries where there is no where attribute, mb?(field)(=/!=/<>)</p></div> | ||
| + | <br /> | ||
| + | |||
<h2>'''Settings for groups'''</h2> | <h2>'''Settings for groups'''</h2> | ||
<p>When you need to change data such as login, password, port, type of port for a group of devices, click on the [[File:settings-for-group.png|Settings for groups]] button. The following window will appear:</p> | <p>When you need to change data such as login, password, port, type of port for a group of devices, click on the [[File:settings-for-group.png|Settings for groups]] button. The following window will appear:</p> | ||
| − | [[File:group- | + | [[File:group-settings2.png|Settings for groups]] |
<p>Enter the new data and tick the changes that you want to apply for the selected group of devices. Click OK and in the device settings for the selected group the data that you noted will change.</p> | <p>Enter the new data and tick the changes that you want to apply for the selected group of devices. Click OK and in the device settings for the selected group the data that you noted will change.</p> | ||
<h1>'''Pooling jobs'''</h1> | <h1>'''Pooling jobs'''</h1> | ||
<p>This tab is intended for to create tasks for testing the availability of devices by groups.</p> | <p>This tab is intended for to create tasks for testing the availability of devices by groups.</p> | ||
| − | [[File:pooling- | + | [[File:pooling-jobs2.png|Pooling jobs]] |
| − | + | <h2>'''Add job'''</h2> | |
| + | <p>To add a group, click the [[File:add.png|Add job]] button and the following window will appear:</p> | ||
| + | [[File:pooling-job-add.png|Add job]] | ||
| + | <p><ul> | ||
| + | <li>Job Name - Any convenient job name.<br></li> | ||
| + | <li>Group Name - Select group.<br></li> | ||
| + | <li>Period type - Select verification period.<br></li> | ||
| + | <li>GPS - Take GPS coordinates.<br></li> | ||
| + | <li>Description - Comment or description for the job.<br></li> | ||
| + | </ul></p> | ||
<div id="BackToTop" class="noprint" style="background-color:#DDEFDD; position:fixed; | <div id="BackToTop" class="noprint" style="background-color:#DDEFDD; position:fixed; | ||
Latest revision as of 01:24, 8 June 2021
Device List
It is used to add devices to the database and group them according to the selected attribute. Further, when using other modules of mupsbox, we will work with groups of devices.
-
On the Device List tab, there are buttons (from left to right):
 - Add device
 - Remove device
 - Enable device
 - Disable device
 - Device settings
 - Start winbox
 - Start ssh
 - Refresh
 - Check the availability of a dedicated device
 - Check the availability of all devices
 - Kill threads
 - Export the list of devices (including their data, such as un, login, password, etc.)
 - Import the list of all devices (including their data, such as un, login, password, etc.)
 - Update the ROS version
 - Upgrade the BIOS
 - Send a command to the selected device
 - Export the visible list of devices in Excel
 - Geolocation by coordinates
 - re-read and overwrite data of selected devices
 - re-read and overwrite data of all devices
 - Upgrade LTE modem
Add device
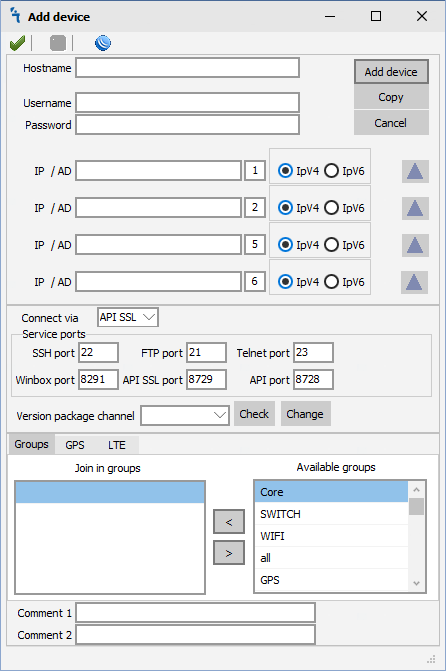
To add a device, press ![]() , a window will appear where you need to enter device data.
, a window will appear where you need to enter device data.
- Hostname - Any convenient device name.
- Username - Username to login to device.
- Password - Password to login to device.
- IP / AD - Device IP address.
- Connect via - connecting to the device via
- SSH port - Your ssh port, which you registered in Ip -> Services
- FTP port - Your ftp port, which you registered in Ip -> Services
- Telnet port - Your telnet port
- Winbox port - Your winbox port
- API SSL port - Your API SSL port
- API SSL - Your API port
- Version package channel - Your version package channel on royter
- Join in group - Select the groups to which the device will belong.
- Available groups - Existing groups created in the Groups tab.
- Add device - After entering all the data, click the add device button. All data will be applied and you will see your device in the device list.
- Copy - If you have many devices with the same data, and differ only in Hostname and IP address, use the copy button to speed up the process of making devices.
- Comment - Comment on the device.
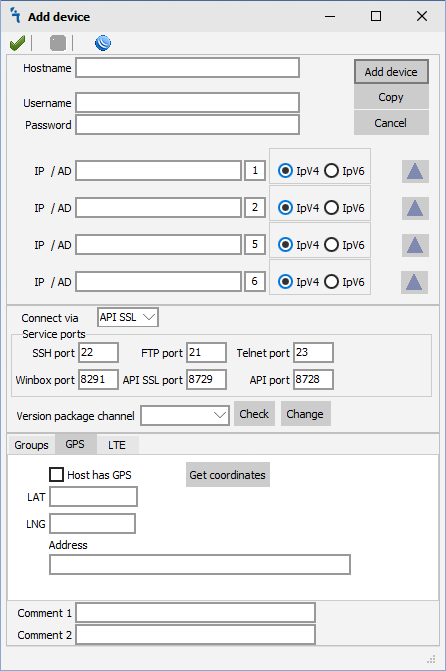
- GPS tab - you can enter the coordinates and address of the location of the device in order to display it on the map in the GeoTrack module
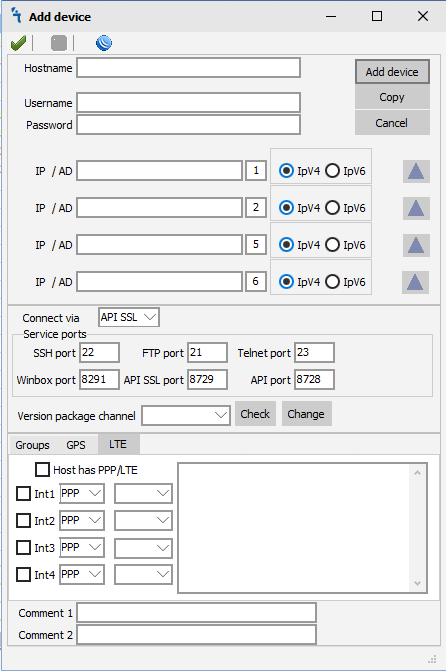
- LTE tab - If your device has an LTE modem, specify them for the possibility of updating (At the moment it works only for Mikrotik devices)
Export and import devices
To export all devices with their data, click the ![]() button. A confirmation window will appear.
button. A confirmation window will appear.
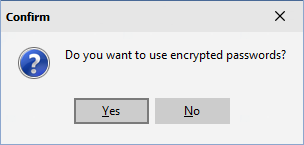
If you want to export all data including passwords, click yes. If you want to export all data without passwords, click no. (All passwords in the program are encrypted.)
To import all devices with their data, click the ![]() button. A confirmation window will appear.
button. A confirmation window will appear.
If your file contains encrypted passwords, click yes; otherwise, click no.
Command line
To send a ROS command to a specific router, select the router using the navigation keys or click on it with the mouse and click the ![]() button. The following window will appear:
button. The following window will appear:
Enter the command in the field and click Enter. Don`t use SSL checkbox is used to ignore the API-SSL port and send commands on the API port.
If you entered several commands in a row, you can navigate between them using the up and down arrows
Also, you can load the RSC file with the settings. Select the file by clicking .. and press the GO button
Working with device lists and filtering
If you have a lot of devices and you need to filter the device (s) by a specific attribute (Hostname, IP address, board-name, etc.), start typing this character in the Search field.
Having sorted the devices by a certain attribute, you can export the sorted list to Excel by pressing the ![]() button.
button.
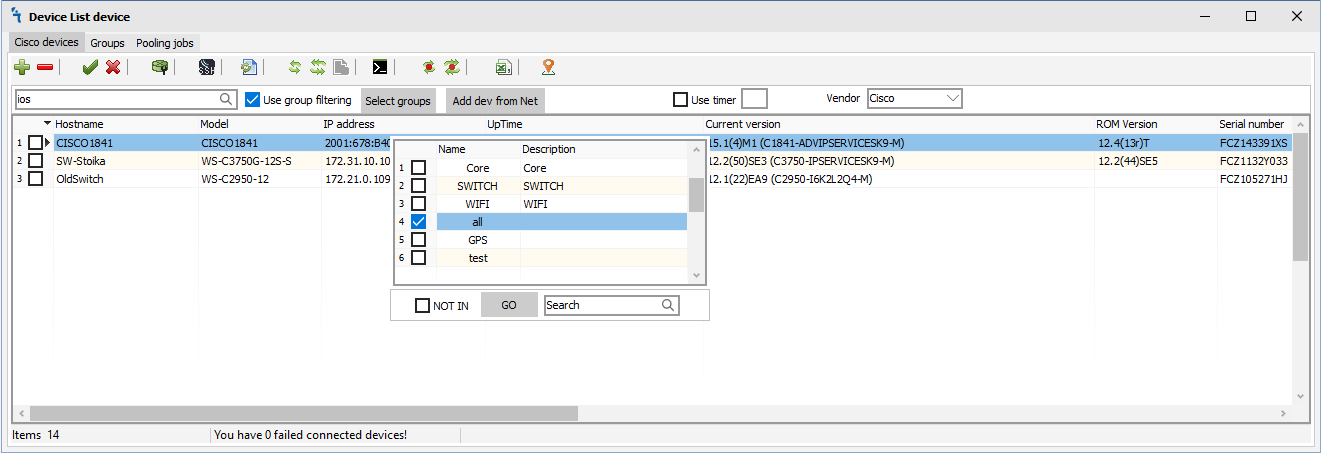
To filter devices by groups, check the box to use group filtering. To select filtering conditions by group, click the Select groups button. The following window will appear:
Check the box next to the group (s) you want to display. If you check a NOT IN, it will show all devices that are not included in the marked group.
To navigate through the devices, you can use the up and down navigation keys. Clicking Enter on the selected device opens a window with its data. Clicking delete the program will prompt you to delete the selected device or selected devices. To select devices, use shift and ctrl keys. You can select devices with the left mouse button, deselect with the right.
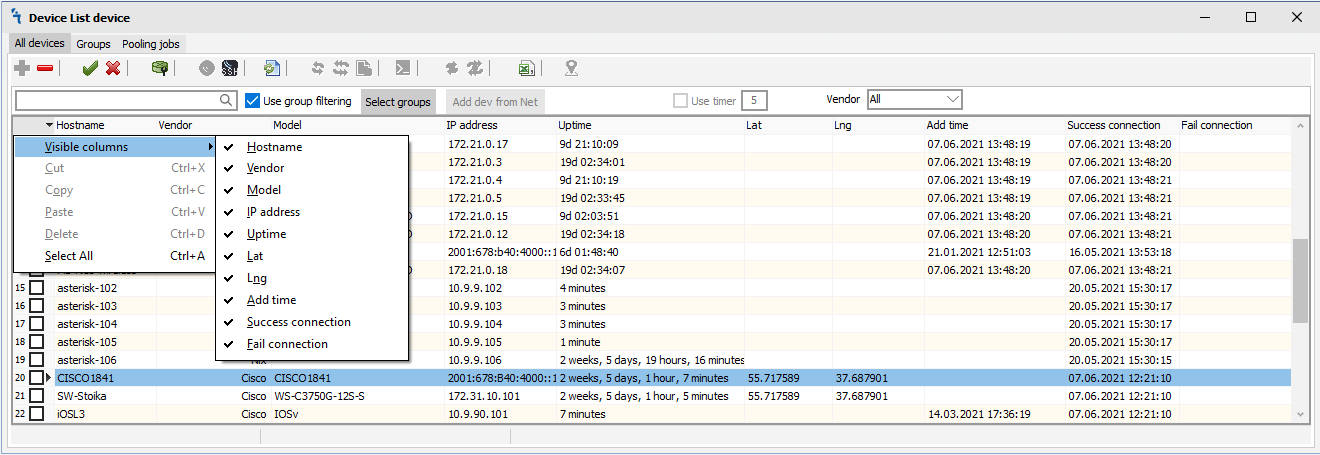
Customize Device List
To turn off unnecessary columns, click the down arrow next to the hostname column. As shown in the picture below. Use the mouse to select the columns you want to disable or enable for viewing.
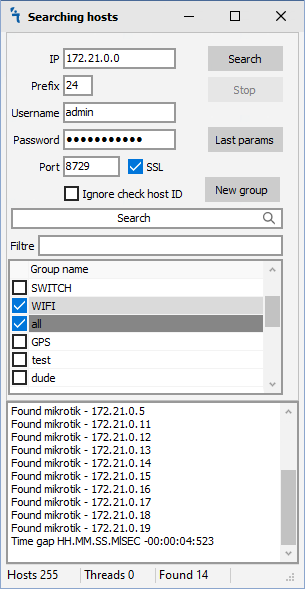
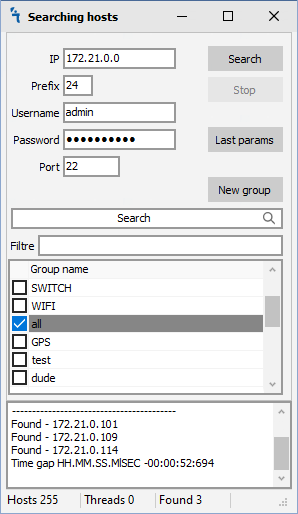
Add device from Net
Search and add Mikrotik devices in automatic mode.
- IP - subnet.
- Prefix - Mask.
- Username - Username to login to device.
- Password - Password to login to device.
- Port - Your api or api-ssl port that you opened on RouterOS.
- New Group - Create new group.
- Ignore check host ID - If you have several IP addresses on your device and you do not want to add them all, check the box and the program will check the software id and not add the same router.
- Filtre - You can scan devices into specific groups from the entire network using the filter by board name or model.
- Group name - Select the group to which devices will be added.
Groups
This tab is intended for creating groups, sending commands to a group of devices and for modifying the data of a group of devices in the device list.
Add group
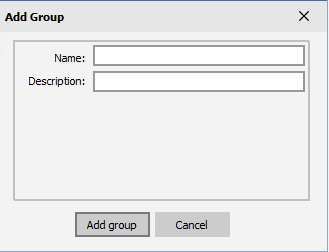
To add a group, click the ![]() button and the following window will appear:
button and the following window will appear:
- Name - Any convenient group name.
- Description - Group description.
Remove group
To remove a group, click the ![]() button. A query will appear:
button. A query will appear:
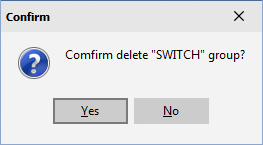
Click Yes to delete or No to cancel.
Command line
To send a ROS command to a group of devices, select the group using the navigation keys or click on it with the mouse and click the ![]() button. The following window will appear:
button. The following window will appear:
Enter the command in the field and click Enter. Don`t use SSL checkbox is used to ignore the API-SSL port and send commands on the API port.
If you entered several commands in a row, you can navigate between them using the up and down arrows
Command line (API samples)
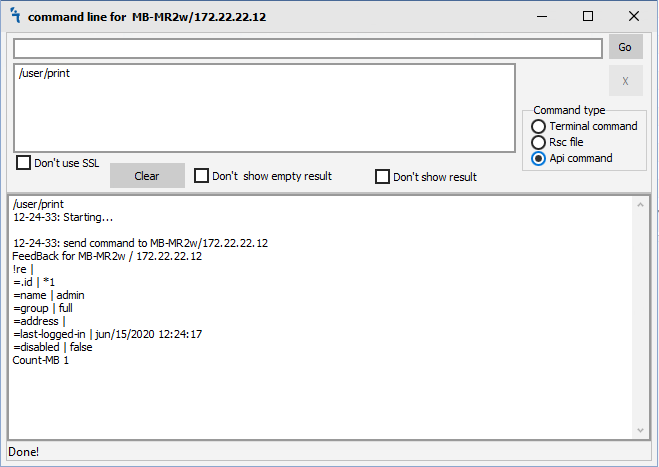
Using api - you get feedback. This is very important because you will always know if the command was executed successfully. Also, you get the opportunity to build reports using API: request->response. Here are some examples.
add new user
/user/add
=name=username
=group=full
=password=userpassword
=comment=this is new user
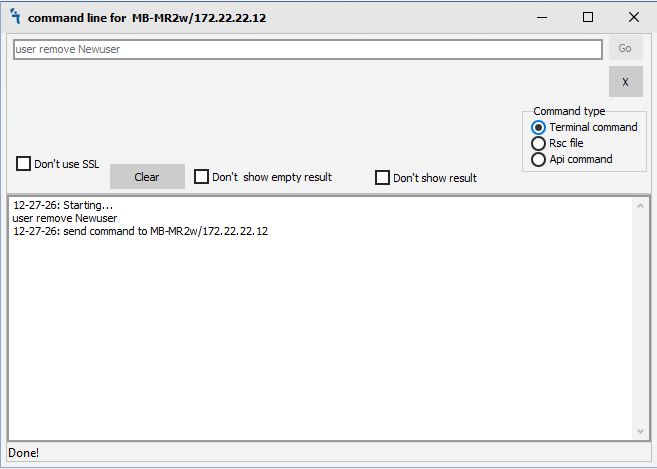
remove user
/user/remove
=.id=username
on which router is the user 'admin'?
/user/print
?name=admin
mbcount==1
on which router firewall is not configured, for example, rules < 3 ?
/ip/firewall/filter/print
mbcount=<3
disable all rules in /ip/firewall/filter where chain=input and action=drop
/ip/firewall/filter/disable
?chain=input
?action=drop
?#&
mbgetid
on which router is dns server 8.8.4.4 configured?
/ip/dns/print
mb?servers=8.8.4.4
Notice: mbcount - proproetary function mupsbox, gets counts data replies (!re),mbcount= (=x, >x , <x, ==x, =>x, =<x). mbgetid - allows you to combine several commands: perform an action with a preliminary request to get id, execute a print query c .proplist = .id, storing the result in the array and then performing the desired action. mb?filed - allows you to build queries where there is no where attribute, mb?(field)(=/!=/<>)
Settings for groups
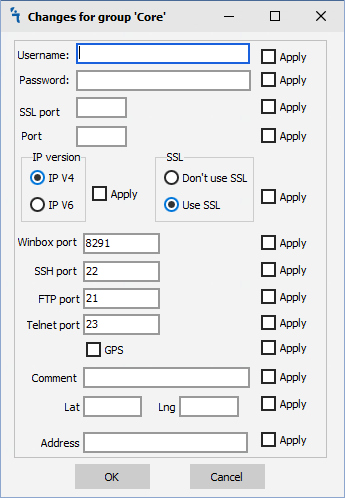
When you need to change data such as login, password, port, type of port for a group of devices, click on the ![]() button. The following window will appear:
button. The following window will appear:
Enter the new data and tick the changes that you want to apply for the selected group of devices. Click OK and in the device settings for the selected group the data that you noted will change.
Pooling jobs
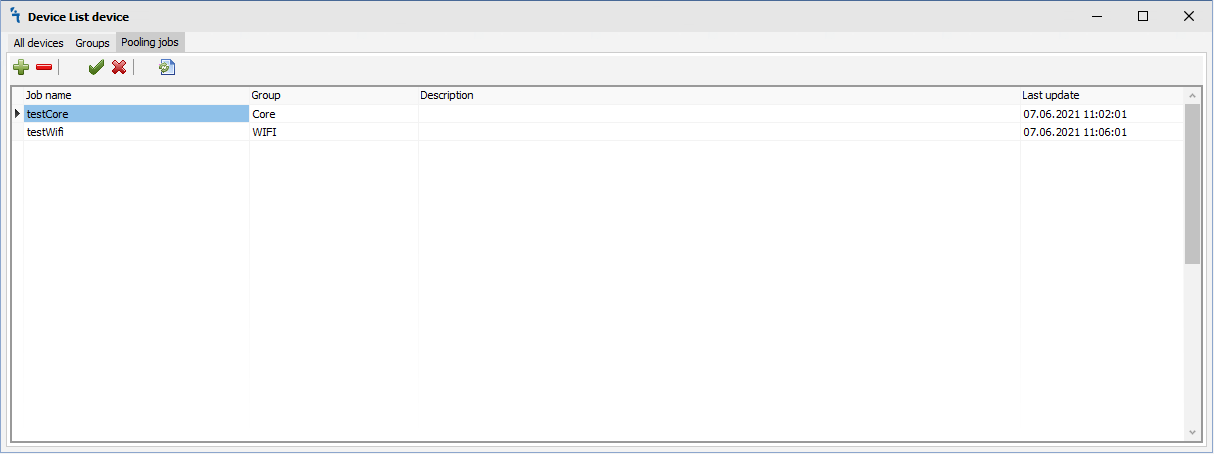
This tab is intended for to create tasks for testing the availability of devices by groups.
Add job
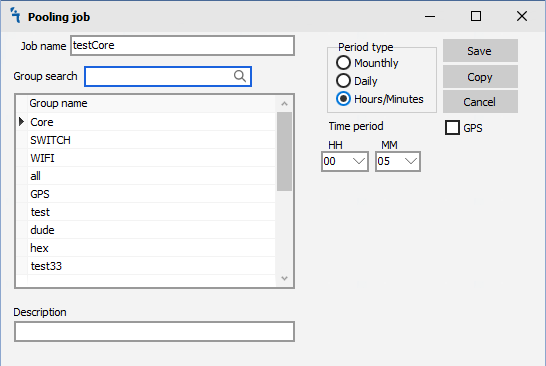
To add a group, click the ![]() button and the following window will appear:
button and the following window will appear:
- Job Name - Any convenient job name.
- Group Name - Select group.
- Period type - Select verification period.
- GPS - Take GPS coordinates.
- Description - Comment or description for the job.
